Thursday 25 April 2013

The Mini-Diana Lomography Experiment Part II

You may remember this, the first part of The Great Lomography Experiment! The results were awesome, but a little limited (only about 10 photos tops!). So undeterred we have soldiered on and shot another roll of film on the gorgeous Mini Diana. Want to see the results?! Well they are coming right up! Here are some of my favourites, completely pure, unadulterated by photoshop or any other filters!


First off a fantastic view of South London from Josie's flat. What a view! And lucky to catch it at the golden hour on a sunny London day - a rarity!!


The big old 30th birthday! I am a very lucky girl - that cake was EPIC! It will live in legend - my kids will one day hear ALL about it. And if they don't already think I'm ancient then the 70s feel of these shots will definitely confirm it! This is all thanks to the coloured, lime green flash!


Christmas angels decorating the tree! :) Best thing about getting a film developed old school style is that i spans such a wide time frame. Not used to that these days! This second shot above includes two exposures (at least) - one from my birthday and a second at Christmas over 6 weeks later. So basically this whole post is like a round up of the best bits of the last 6 months. Yeay!


Head on a plate, haha! Anyone fancy a nibble of Vanessa? Hanging out in Brixton and Mango Landings. Mostly dancing and flexing our muscles!


One of the best NYEs ever! Nothing can beat a good ol' knees up in the living room with yer buddies. Well, until you bust out your whole collection of hats and sunnies to deck out the team and up the ante another notch! :)


Finally a spot more fancy dress as Claire's hen. I LOVE the effect on this last photo - it must have been the first exposure on the whole film. This is the best thing about lomography, I could never have created that effect with the dslr or photoshop even if i'd tried! Anyone else experimenting with toy cameras? I've love to check out the result...and pick up a few tips! :)

Sunday 14 April 2013

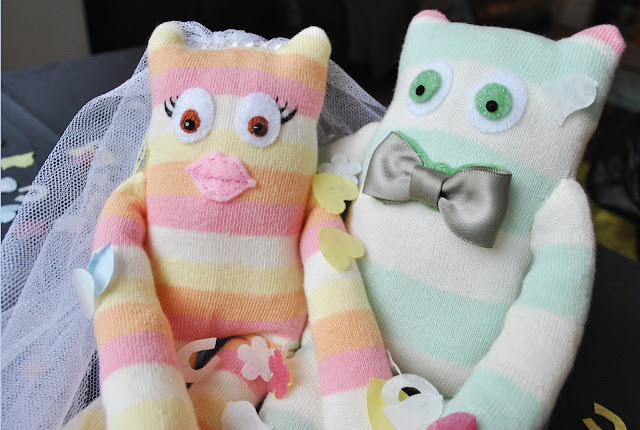
DIY Fantastic: Wedding Sock Monsters


You may remember this teaser post from many moons ago? Well probably not! But, this illustrates just how long this project has been in the mix. It is undoubtably my most long-running diy project yet! But, don't let this put you off, it's more a reflection on my lack of concentration than the complexity of the diy!


The full sock monster instructions and diy post can be seen here so we shan't run the whole thing once more. But all you need is some fun coloured socks, stuffing, needle and thread and whatever decorations you fancy, from buttons, gems, ribbons, net etc! You can get creative and make them in all different shapes and sizes.


I find the facial features the hardest and the most critical as they convey the little monster's character! In these I was particularly please with the bride's beautiful long lashes (soooo Lisa!) and the groom's bright green eyes.


These little cuties were made for a friend's wedding gift, to go with the album you've already seen! They were personalised to match the lovely couple and I tried to incorporate as many of their features as possible and even include some items from the actual wedding. The groom's bow-tie was made with ribbon from my bridesmaid dress and the gems on the bride's tiara were made with the decorative gems from our table on the big day!


So given we are gearing up for wedding season why not make a pair of fabulous sock monsters for the special couple? I love how personal they are and how easy to adapt to any occasion. Do you know anyone celebrating something special this year that these would make a lovely pressie for? Then get to it!


Thursday 11 April 2013

DIY Fantastic: Quartz Pear Drop Necklace


I've been wanting to create a fun, bold modern necklace using real materials for a while. After a little perusing on the ol' world wide web I stumbled across these gorgeous honey coloured quartz beads in a tear drop shape and some super cute neon ones too. Don't they look like pear drops? Almost good enough to eat! Erm, I wouldn't recommend it, so lets get right down to work...


These are the ingredients I pulled together:

1. Beading wire
2. Silver plated belcher chain
3. Silver plated lobster clasp
4. Silver plated jump rings
5. Honey quartz pear drop beads, that I found here
6. Green neon dyed beads, also from here
7. Pliers


The best thing about this necklace is that it looks complicated, but is actually super simple! I loved combining the natural colour of the quartz with the neon green colour of the separator beads, but you can go with any colour combo you fancy and then just follow these few steps:

1. Cut the beading wire into two six inch pieces and string on your beads. I opted to make the second strand slightly longer than the first one so that it'd hang slightly lower and created the layered effect I was after.


2. Once you are happy with your stringing knot off the ends and snip the ends off. I knotted the wire strands directly onto the jump ring and used a tiny dot of glue to ensure it didn't come undone!

3. For step three use the pliers to gently open the jump rings. Take your belcher chain and divide into two equal pieces. Try it out for size on yourself regularly so that it hangs just where you want it to!


4. Attach one end of each strand of chain to the two wire strands and gently prise the jump ring closed. Then repeat on the other side.

5. Finally, attach the lobster clasp to each loose strand of chain with the last two jump rings.

6. and tah-dah! You're beautiful necklace is complete! :)


And finally a sneaky little out-take. (You know how I like to end all my posts!) This is what most of our shots look like when Izzy and I get together to take a few photos... :)


Thank you for modelling Izzy, you're gorgeous!

Monday 1 April 2013

DIY Fantastic: Wedding Album

This is a very special diy that I've been working on for a very special couple. Last year I had the honour of being a bridesmaid for a dear old school friend and I was determined to ensure their wedding gift was as memorable as the day itself. I worked on an 'alternative' wedding album - incorporating all those important days and dates in the lead up to the wedding day that weren't captured by the official photographer and all those silly snaps that might not have made the cut into the official album!


The ingredients I gathered together for the job:

1. Printed photos and any other materials you've collected (I had the wedding invitation and the order of service that I'd saved especially, but things such as ticket stubs, travel tickets etc would be perfect)
2. Album (I chose a very simple plain album with thick cream card pages)
3. Craft knife and ruler for trimming
3. Ribbons, sequins, gems, washi tape and any other pretty bits and pieces for decoration
4. Glue stick/spray mount
5. Black ink pen for commentary, illustrations etc!


The best thing about this album is that you can make it to remember any special day, holiday, birthday,  celebration - it's not just for weddings! But having had our first wedding of the year yesterday I'm in full on wedding mode so the time seemed right!

The actual steps to put this together are very simple, trim all the photos to the desired size using the ruler and craft knife. I mixed it up with lots of photos of different shapes and sizes and some with borders and some without as I wanted it to feel more relaxed and eclectic. But you could also trip them to all the same sizes and shape if you want it more co-herent.

I also drew some little illustrations to add some labels and commentary to the photos, these were simple black ink sketches on white card such as those you can see below:


Finally it just came down to arranging the composition of the material within the album. Sounds simple right? Trust me it's not!!! :p I opted for a loosely chronological order starting with a girly visit to the venue, invitation making, hen do and then on to the big day!

Here are some sneaky peaks of some key spreads:


Illustrated rosette and washi tape add some interest to this spread from our visit to Royal Ascot! 


A small amount of editing prior to printing meant I could add some fun captions to the photos, I love 'The Slow Dance' and 'The Kiss' with the inflatable parrot! 


The original invitation was a little bulky, I was tempted to leave it out but very pleased I worked with it in the end.


Some simple white pearly sequins used to decorate the final preparations of the bride!


I love the interactive 'book-within-a-book' feel of including the invitation and order of service!


And finally, you know you can't resist a fun gif to round things off, so here you go:


You can play with this in so many different ways to add character and interest, go experiment!

The only tip I'd add is if you're planning a similar project is to be prepared - collect as much as you can from the actual events so that you can add those personal touches that are easily discarded but when collated together like this can mean so much more than the sum of their parts!

Congratulations Lisa and Steve and thank you for waiting patiently for your gift! :)