Tuesday 24 February 2015

DIY Wedding Dress Part III: Design and Sewing


Now for the last part in this series - the actual making of the dress! (For the first two parts of this epic wedding dress series, see inspiration and materials.)

First we broadly planned the dress by mocking up the dress, swathing me in the fabric and pinning everything together to create a 'dress'! From here, Ma turned this into inspirational sketches and progressed these into a detailed pattern.


Using these patterns we made a series of progressive calico toiles. With each version I was pushed and pulled and squeezed in, until we had a perfect fitting bodice. It was a full family affair with mum pinning and tweaking, izzy giving feedback and dad in charge of project management!! :)


With the small and sturdy (ha!!) bodice perfected, we turned to the skirt. This was to be a full gathered skirt given shape by a layered net underskirt. We cheated a tiny bit here and bought one ready made - this thing was huge and made of hundreds of meters of netting!!

Naturally the dress evolved as we went through this process. Initially I was set on having a tule outer layer on the skirt, as per my inspiration! Ethereal, soft and delicate. But once we'd chosen the perfect silk, I loved it so much I wanted it on show! To be able to scrunch the silk in my hands, feel the texture and see the gorgeous colour of it. So we simply modified the plan.


Once the dress was all pieces together, then came the embellishment. We cut around the motif super carefully with nail scissors and arranged the first strip around the top of the bodice then created a jigsaw puzzle to cover the rest of the bodice! We pinned first and then painstakingly hand stitched each piece on with small invisible stitches.


This part was another serious team effort. Working round the clock Mum would sew all day and then in the evenings Izzy and I would get home to pick it up the evening shift! I can't even think how many hours we all put into stitching that on. But man was it worth it!! :)


With the few gems we had left we added some additional bling to the bridesmaid's dress - creating a belt of bling and adding the scalloped edge along the top of the bodice. This tied in both dresses and literally meant we didn't have a spare gem in the house. Efficiency!!


The restricted quantity of silk meant every cutting exercise was a real mathematical test. Especially the train! We saved back just enough silk for the sash, bodice and flower girl dress and made the rest into the train. It ended up a little longer than I expect, but you gotta live it large or go home, I say!! ;) We devised a system whereby the train could be detachable (heavy duty hooks!) - genius. Once that was decided, there was no practical excuse to hold back, we threw caution to the wind! I loved drama of the train, especially in church, but it was also a relief to finally unhook and feel free to dance the night away!

Ditto with the veil. Having ditched the plan for a tulle top skirt we now had a LOT going spare. Being ones to 'waste not want no't, we put it to use in the veil and as a result I had a Cathedral length veil, Woooah!! :) It was great fun....until flying ants started getting trapped in it during the photos....it was bit like wearing a GIANT insect net on your head. Nice. I channelled my inner next-top-model and posed my heart out until we could dash away from the infestation!


My dress was perfect for our wedding day, it truly was better than anything I could ever have dreamt of as a child, a teenager or a twenty-something! I had always hoped that my Ma would make my wedding dress. She was the ultimate patient and professional wedding dress whizz and my family was the hardest working sewing brigade in the land! :) Thanks to them all I got to wear the most spectacular, unique, couture dress on our special day. I owe them all the biggest thanks in the world!

Photo courtesy of Anushe Low

p.s. you can see plenty more photos of the final dress here, here and here

Sunday 15 February 2015

DIY fantastic: Marshmallows

Who doesn't love a light, fluffy, chewy, gooey mouthful of goodness?! I for one truly LOVE marshmallows!!


Marshmallows have always been intriguing. At a posh dinner recently, Mr Fantastic's desert was accompanied by a home made toasted marshmallow! It was supper yummy and sparked much debate around the table as to how they were made! So, determined to find out I started researching and decided to give them a go.

Turns out marshmallows are incredibly simple. There are just two ingredients. Literally, two. Sugar and gelatine. I followed this recipe, specifically chosen as I didn't want to use egg white. Rather it uses gelatine for setting and whipping for lightness.


The production process is also equally simple (if treacherous!). This is not one for the faint hearted!! First you BOIL sugar and water for twenty minutes, stirring continuously. Cue mega arm guns workout! But that boiling sugar is HOT so you have to be mighty AND precise in your stirring! Some recipes called for a thermometer, which I don't have, so we just winged this a little. Twenty minutes of a continuous rolling boil plus an extra blast for the last 5 seemed to do the trick! 

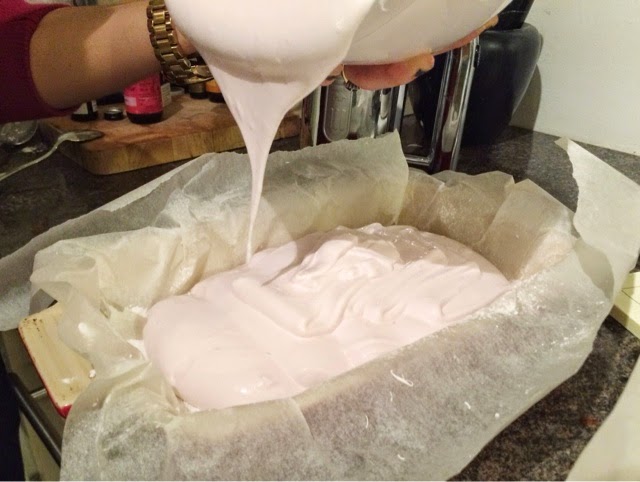
Then the danger level ratches up another  notch as you whisk said boiling liquid!! :s Pour the boiling syrup into a LARGE bowl with the gelatin and whisk your little heart out...for another 20 minutes. I say large as you're looking to at least double the volume of your mixture, and some! We got right up to the rim of my largest bowl by the end and our poor whisk was definitely out of it's depth!! 


At this point it should be BIG and light and leave ribbons along the surface. Then you can go to town on flavouring, colouring and decorating! We divided the mixture up and made half with a dash of pink colour and rose water and another we left white and added orange oil. Yum! 


Then you decant into a large flat container lined with buttered baking paper dusted liberally with icing sugar, top with a another dusting of icing sugar and allow to set. Note: don't pop it into the fridge, cooling at speed will enable crystals to form and you'll loose the silky smooth texture. 


Finally, once fully set (I left ours overnight covered gently by a tea towel) tip out on to the work surface (dusted once again with more icing sugar!) and cut into any shapes you like. Dust each freshly cut side with more icing sugar and pop them, piled up high, in an air tight container.


We rolled a batch of freshly cut cubes (not dusted in icing sugar) in toasted coconut flakes and they were the firm favourites. You could use nuts, seeds, fun-fetti, whatever takes your fancy! 

Store in an airtight container and tuck into at every opportunity - My favourite is piled into hot chocolate or toasted on the fire! Stored carefully they should last up to a week, but they are DEF the yummiest when eaten fresh!! :) 


Out-take: this below is the sticky end of my delicious looking hot chocolate. Attempting to precariously balance it on a chair for an Instagram marathon resulted in disaster (got the physics all wrong!). Gutting and the clean-up exercise was a complete MISSION! :s Serves me right for prioritising Instagram and not tucking straight in! 


Monday 9 February 2015

Fantastic Design Crush: Margo Selby

My two Margo Selby duvet covers just arrived!! And I am beyond excited!!


I MAY have mentioned Margo Selby here once (or twice!) before, ha!! And if you follow me on twitter you'll be well aware of my lusting! (And if you don't then time you joined the party!) And in real life it's no different - I can't seem to stop banging on about her! So I think I finally have to admit to having developed a bit of a design crush! :) 

There are not many designers out there who can drive me to such crazy lengths for the perfect pair of curtains. In an absence of this Jessica fabric being sold by the metre I have picked up not one, but TWO duvet covers to turn into curtains!!! Yes that's right! I've bagged the biggest duvet covers going to maximise fabric meterage and it's going to be an 'interesting' sewing project that will test my skills to the limit!!
From here
Margo Selby creates such fabulously textured textile - bright, colourful, tropical and dramatic! You can see lots more of her work over on her blog. I love the combination of pastels with zingy neons. The graphic patterns bring the colours right up to date and make me dream of being in a lush, dark dramatic jungle with a shaft of bright sunlight picking out the foliage. Magic!

The fabric I've gone with is a little less dramatic as I want to create a light, happy, poppy place that makes me happy to wake up to each morning! The Jessica fabric is a great combination of colour and pattern and still has the lovely textured weave and weight. Perfect for my light bedroom curtains. I'll share progress soon.
Floor cushion available at John Lewis
For more info, you can find out more on Margo's website here and follow Mergo Selby on twitter and pinterest, or buy her first cushion available from John Lewis these days.


p.s. See here for the pom-pom cushions I made using other scraps of the Jessica fabric!

Friday 6 February 2015

On Being Grown Up Siblings


I have just turned 32 and late last year had the first real opportunity to spend time with my brother and sister and partners as real 'grown ups'!! Yes, crazy how late I am to this party!! And I don't mean pretending to be grown up while our parents continue to make all the decisions, buy the food supplies, drive us around etc, but like when we're all in charge of ourselves and our folks are nowhere to be seen!


This may sound like very old news to most of you. But since my brother has been the other side of the world for the last 7 years we haven't had much opportunity to just be on the same continent let alone in the same room!! In contrast, I'd happily spend every spare minute of the day with my lil sis, but I definitely regress when I'm with her! No growing up is done when we get together!!! Hehe!


So it was a great suprise to me when we spent a week in Bordeaux and the environs with all my sibling and not a parent in sight, that we actually all got on. Not just that, we actually enjoyed each other's company, had things to talk about AND had a brilliant time!! Blimey! 


Last time we spent seven days in close confinement (My bro's flat, the small hire car for our road trip and a small Air BnB pad in San Seb) was probably when we all lived at home, well over 10 years ago!! Miraculously we did NOT fall out, not once. Miracle! (I hope my Ma is reading this, she'll be so proud!! Hopefully that makes up for her dissappoinent at not actually being there with us!) 


We stayed up to the wee hours in the flat debating and setting the world to rights, nursing glasses of French Bordeuax and snacking on delicious smorgasbords of saussicon, pate and cornichions. We went for long companionable walks along the coast, we stopped off in cute little coffee shops, we traded eating habits with mixed picnics, we stopped for spontaneous lunges on the beach when the smell of moules-frites in the sunshine just got tooo much for us!  We surfed the beautiful warm waters of San Sebastien as the sun set and we shared a delicious tapas meal that went on for hours! In a word – bliss!


Growing up I never thought about what our future lives as siblings would be like. We were too busy bickering!! But it really is a revelation to spend time with someone who has the same background and outlook on life as you, but who diverted down a different avenue during early adulthood so have had very different growing up experiences. It means they approach the big things in a similar way, but still have such valuable advice, ideas and a different ways of living. It's like discovering new friends that you instantly just click with!! Magic!

I wonder whether we're still getting on so well when we reach the ripe old age of this Monsieur. I do hope so!


Oh, and it turns out we still like to take TONS of jumping photos!


How do you get on with your siblings now that you're 'fully grown'?! Any better or worse?! :)


p.s. Read more from our trip to Bordeaux region vineyards here